How to Create Amazing Panoramic Photos
How to Create Amazing Panoramic Photos. Are you tired of taking regular photos that fail to capture the grandeur and beauty of a scene? Do you want to learn how to create stunning panoramic shots that will leave your viewers in awe? If so, then you’ve come to the right place. In this blog post, we’ll be discussing the art of creating amazing panoramic photos.
From the equipment needed to the techniques used, we’ll cover everything you need to know to take your photography skills to the next level. So grab your camera and let’s get started on mastering the art of panoramic photography!
Introduction: Why Panoramic Photos are Worth Mastering
Panoramic photos are more popular than ever, thanks to their ability to capture sweeping landscapes and cityscapes like never before. But creating a truly amazing panoramic photo takes more than just pointing your camera and shooting away. Mastering the art of panoramic photography requires understanding the basics, choosing the right equipment, finding the perfect location, setting up your camera correctly, capturing and stitching photos together seamlessly, and editing them to perfection.
In this guide, we’ll take you through each step in detail so that you can create stunning panoramic photos that will wow everyone who sees them. Whether you’re a professional photographer or just starting out with your first DSLR camera, mastering panoramic photography is an essential skill* that will help take your craft to new heights.
Understanding the Basics of Panoramic Photography
Panoramic photography is all about capturing a wide and expansive view of a landscape or cityscape. To create amazing panoramic photos, it’s important to understand the basics of this technique. Firstly, it’s important to have a clear idea of what you want to capture in your shot. Secondly, you need to have a good understanding of your camera’s settings and how they can be adjusted for panoramic shots.
One important setting is the exposure, which should be set manually to ensure consistency across all shots. Another key setting is the focus, which should be set to manual mode to ensure that all parts of the image are in focus. Finally, it’s important to use a tripod to keep your camera steady and avoid any unwanted movement that could ruin your shot. By mastering these basics, you’ll be well on your way to creating stunning panoramic photos that will impress everyone who sees them.
Choosing the Right Equipment for Panoramic Photography
When it comes to panoramic photography, having the right equipment is crucial. One important piece of gear you’ll need is a tripod that can hold your camera steady and level throughout the entire shoot. Look for a tripod with a ball head so you can easily adjust the angle of your camera.
Another essential tool is an L-bracket, which attaches to your camera and allows you to quickly switch between landscape and portrait modes without changing the position of your setup.
To capture high-quality panoramic photos, it’s also recommended to use a lens with a focal length in the wide-angle range – ideally 28mm or less. A prime lens is preferred over zoom as it produces sharper images with less distortion.
Additionally, investing in ND filters can help control exposure in bright lighting conditions while maintaining image quality. With these tools on hand, you’re well on your way to capturing stunning panoramic shots!
Finding the Perfect Location for Panoramic Photoshoots
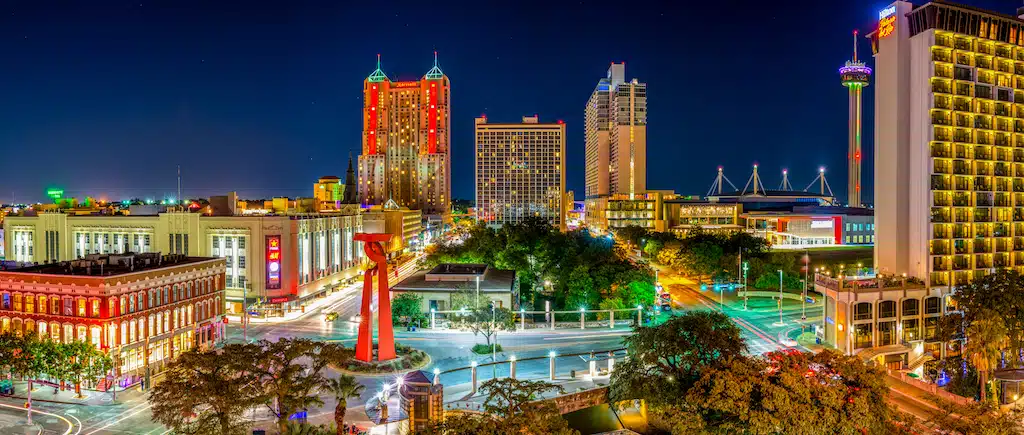
Scouting is key when it comes to finding a great location for panoramic photos. Look for open spaces with interesting foreground elements and strong leading lines that can guide your viewer’s eye through the image. Waterfronts, mountaintops, and urban skylines are all popular choices but don’t be afraid to explore less-known places in search of unique perspectives.
Consider the time of day you’ll be shooting as well- early morning or late afternoon light will provide warm tones and long shadows that add depth to your images. Pay attention to weather conditions too- dramatic skies can take a good panorama shot into something exceptional.
Be sure to check if photography permits are required in certain locations before setting up your tripod. Keep safety in mind as well- stay away from cliff edges or other dangerous areas while capturing your shots. With some research and patience, you’ll find incredible spots perfect for creating stunning panoramas!
Setting Up Your Camera for Panoramic Shots
Proper camera settings are crucial in creating amazing panoramic photos. First, set your camera to manual mode to have full control over the exposure settings. Use a wide-angle lens to capture a wider field of view. Next, adjust your aperture to f/8 or higher to ensure that everything in the frame is in focus. Set your ISO to the lowest possible setting to reduce noise and maintain image quality.
To ensure that your photos will stitch together seamlessly, use a tripod and a panoramic head. The tripod will keep your camera steady while the panoramic head will allow you to rotate your camera around its nodal point, minimizing parallax errors.
Finally, use a remote shutter release or self-timer to avoid camera shake when taking the shot. With these settings and equipment in place, you’re ready to capture stunning panoramic photos.

Capturing and Stitching Your Panoramic Photos Together
Capturing the Perfect Shots for Panoramic Photos
To capture stunning panoramic photos, it is essential to take multiple shots that can be stitched together seamlessly. Use a tripod and level to keep the camera steady, then adjust your settings for consistent exposure across all images. Overlap each photo by about 30% to make sure they blend well in post-processing.
When shooting, start at one end of the scene and work your way across while rotating the camera horizontally. Alternatively, you can take vertical shots and stitch them together vertically for a different effect. With practice, you will learn how to capture amazing panoramic photos every time!
Stitching Your Panoramic Photos Together: Tips and Techniques
When it comes to stitching your panoramic photos together, there are a few key tips and techniques you should keep in mind. First and foremost, use software specifically designed for panoramic stitching, such as Adobe Lightroom or PTGui. This will ensure that your images are aligned properly and any distortion is corrected.
Secondly, be mindful of overlapping each image by at least 30% to allow the software to seamlessly stitch the images together. Take care not to move the camera too much between shots, as this can create errors in the stitching process.
Finally, use manual settings for exposure and white balance to maintain consistency throughout all of your shots. By following these tips and techniques, you’ll be able to create stunning panoramic photos with ease.
Editing and Enhancing Your Panoramic Photos for Maximum Impact
Once you have captured your panoramic photos and stitched them together, it’s time to edit and enhance them for maximum impact. Panoramic photo editor software like Adobe Photoshop or Lightroom can help with tasks such as color correction and exposure adjustments. You should also consider cropping the image to create a more pleasing composition.
To make your panoramic photo stand out even further, experiment with adding different filters or textures to give it a unique look. Don’t overdo it though, as too many effects can make the photo appear busy and distracting. With these simple editing techniques, you can take your panoramic photos from good to amazing in no time!

Tips and Tricks for Creating Stunning Panoramic Photos
Tips and Tricks for Creating Stunning Panoramic Photos
If you want to elevate your panoramic photography skills, here are some tips and tricks that can help you create amazing shots.
- *Use a tripod*: Stability is important in panoramic photography. A sturdy tripod will prevent camera shake, which can ruin the image stitching process.
- *Shoot in manual mode*: Shooting in manual mode ensures consistent exposure throughout all the frames of your panorama. This makes it easier to stitch them seamlessly together.
- Find interesting foreground elements: To make your panoramas stand out, include visually compelling foreground elements such as trees or rocks. This adds depth and dimension to your shot.
- Use bracketing: Bracketing allows you to capture multiple exposures of the same scene with different settings. Combine these images later on during editing for a more dynamic range of colors and tones.
- Mind the overlap: Make sure each frame overlaps enough with the previous one (about 30%) so that they can be merged smoothly together later on during post-processing.
With practice and experimentation, implementing these tips will help take your panoramic photos from ordinary to extraordinary!
Conclusion: Putting Your New Skills to the Test
Putting Your New Skills to the Test
Now that you’ve learned how to create amazing panoramic photos, it’s time to put your new skills to the test. Don’t be afraid to experiment with different locations, lighting conditions, and camera settings. Remember that practice makes perfect, so keep practicing until you’re comfortable shooting panoramas.
One way to challenge yourself is by entering photography competitions that feature panoramic shots or joining a photography club where you can share your work with other photographers and get feedback on how you can improve.
Don’t forget about social media either! Share your masterpieces on Instagram, Facebook, or Twitter using relevant hashtags like #panoramaphotography or #panoramicviews. You might just attract new followers who are impressed by your beautiful compositions.
Above all else, have fun and enjoy the process of creating beautiful panoramic photos. With dedication and patience, you’ll continue to hone your skills and capture breathtaking images for years to come.
Congratulations, you now have the knowledge and tools necessary to create amazing panoramic photos! Remember that practice makes perfect, so keep experimenting with different locations, equipment setups, and editing techniques. Don’t be afraid to ask other photographers for advice or critiques.
Keep in mind that every photographer has their own style and vision; embrace yours and let it shine through your work. With dedication and patience, mastering the art of panoramic photography will open up a whole new world of creative possibilities for you as a photographer. Happy shooting!